Kauden loppu lähestyy ja sitä myötä kiire lisääntyy (siksi ei postausta viime viikolla ja tämäkin myöhässä). Näytösvalmistelut ovat loppusuoralla ja todistukset melkein kirjoitettu. Kohta on edessä ihana kesäloma reissuineen, tänä vuonna käyn Berliinissä sekä New Yorkissa ja Torontossa.
The end of the semester is nearing and the days before my long holiday are nearing. I have been preparing (once again) costumes for my students, hence no post last week. But soon I'm off to holiday. First to Berlin and then to New York and Toronto.
Näytetään tekstit, joissa on tunniste askartelu. Näytä kaikki tekstit
11.5.2015
5.1.2015
Heijastimia - Reflectors
Löysin Sinellistä noita hienoja retroja lumihiutaleheijastimia. Ei muuta kuin letitettyä 7 veljestä (kolme lankaa puolitettuna) naruksi, hakaneula päähän ja menoksi!
I found these cool retro snowflake reflectors from Sinelli. I just braided some 7 Brothers yarn (three strands doubled) and but a safety pin on. That's it!
Tunnisteet:
askartelu,
crafting,
diy,
heijastin,
safety reflector
23.12.2014
Joulua - Christmas
Blogissa on ollut vähän aikaa hiljaista, kun työt ja siihen liittyvät oheisasiat veivät kaiken ajan. Nyt on kuitenkin niistä selvitty ja edessä on muutaman päivän joululoma. Sain vielä kaiken kiireen keskellä pyöräytettyä joulukortit, jotka ehtivät kuin ehtivätkin ajoissa saajilleen perille.
Inspiraation korttiin sain Kristina Wernerin videosta jo viime vuonna, mutta haluamani leimasinsetti oli myyty loppuun. Viimein kevään korvilla sain leimat käsiini. Kristina Wernerillä on muuten aivan huikeita korttivideoita!
Alkuperäinen kortti oli tehty punaiselle pohjalle valkoisella kohopulverilla, mutta halusin kokeilla kultaa ja hopeaakin kun niitä sattui varastostani löytymään. Mitään kuumailmalaitetta minullahan ei ollut, sulatin pulverin leivänpaahtimen yläpuolella! Minulla oli ainoastaan kraft- väristä korttipohjaa, joten valinta sen osalta helpottui huomattavasti. Leimailuista ei tullut täydelliset, mutta ehkä tuo pieni rosoisuus sopii tähän tapaukseen.
The blog has been quiet for a while, whilst work and things have taken up all of my time. Now they are done and I have a few days of Christmas holiday to look forward to. During all the hassle I managed to whip up cards for our families and friends, and they even made it to the recipients in time.
I got the inspiration for the cards from Kristina Werner's video already a year ago, but the stamp set I wanted was almost impossible to get a hold of. Finally nearing spring I got it, and now I got to use it for the first time. Kristina Werner has amazing card videos! You should take a look.
The original card was made with red card stock and white embossing powder, but as I only had craft card stock in hand, the choice was easy. I wanted to test out my gold and silver powders also, and while the stamping is far from perfect, I think a little rustic wine suits the cards. I didn't have a heat tool, so I melted the embossing powder over my toaster!
Inspiraation korttiin sain Kristina Wernerin videosta jo viime vuonna, mutta haluamani leimasinsetti oli myyty loppuun. Viimein kevään korvilla sain leimat käsiini. Kristina Wernerillä on muuten aivan huikeita korttivideoita!
Alkuperäinen kortti oli tehty punaiselle pohjalle valkoisella kohopulverilla, mutta halusin kokeilla kultaa ja hopeaakin kun niitä sattui varastostani löytymään. Mitään kuumailmalaitetta minullahan ei ollut, sulatin pulverin leivänpaahtimen yläpuolella! Minulla oli ainoastaan kraft- väristä korttipohjaa, joten valinta sen osalta helpottui huomattavasti. Leimailuista ei tullut täydelliset, mutta ehkä tuo pieni rosoisuus sopii tähän tapaukseen.
I got the inspiration for the cards from Kristina Werner's video already a year ago, but the stamp set I wanted was almost impossible to get a hold of. Finally nearing spring I got it, and now I got to use it for the first time. Kristina Werner has amazing card videos! You should take a look.
The original card was made with red card stock and white embossing powder, but as I only had craft card stock in hand, the choice was easy. I wanted to test out my gold and silver powders also, and while the stamping is far from perfect, I think a little rustic wine suits the cards. I didn't have a heat tool, so I melted the embossing powder over my toaster!
5.5.2014
Äitienpäiväkortti - Mother's Day card
Äitienpäivä on ihan nurkan takana ja aloin tietenkin miettimään lahjaa omalle äidilleni. Itse lahjan löysin Etsystä, JewelryEveryday- nimiseltä myyjältä. Ostin samanlaiset kaulaketjut äidille ja tyttärelle. Koska itse lahja on niin pieni, ajattelin panostaa korttiin. Tätä ideaa voi soveltaa vaikka mihin, esimerkiksi joulukortit tällä idealla voisivat olla hauskat.
Mother's Day is just around the corner. I found my present from Etsy, a seller called JewelryEveryday.JewelryEveryday. Matching necklaces for mother and daughter with birthstones.
The gift itself is so small in size, i wanted to make an effort with the card. This idea could be used for many purposes, I'm thinking Christmas cards.
Kudottu kortti - Knitted card
Tarvikkeet - Supplies:
Kartonkia - Card stock (käytin/I used Basic Gray: Nook & Pantry stack)
neule - a knitted piece
nitoja ja niittejä - a stapler and staples
liimanauhaa - tape runner
juuttinarua ja neula - jute string and a needle
1.
Loin ensin 19s oikein ja kudoin oikeaa kuusi kerrosta. Sen jälkeen aloitin sydämen intarsianeuloksena. Käytin apunani tätä mallipiirrosta.
First, cast on 19 stitches and knit six rounds. Begin the heart in intarsia, I followed this pattern.
2.
Seuraavaksi leikkasin 30 x 30 cm kartonkiarkista 20 cm korkean, koko arkin levyisen palan. Taitoin palan puoliksi. Mittasin neuleeni ja piirsin kartonkiin joka sivulta 0,5 cm pienemmän neliön, jonka leikkasin sitten auki.
(Tein kortin aluksi Tiimarin vaaleanpunaisesta kartongista, mutta en pitänytkään lopputuloksesta. Vaihdoin craftiin. Jos teet kortin suomalaisesta standardikokoisesta arkista, leikkaa koko arkin levyinen pala ja taita se neljään osaan.)
I cut 20 cm high, sheet width piece from a 30 x 30 cm piece of card stock. I folded it in half.
I measured my knitting, and then drew a square 0,5 cm smaller from each side to the card stock. Then I cut the square out.
(I first made the card out of pink card stock, but didn't end up liking the en result. So I changed to craft. If you make the card using Finnish standard size sheet of card stock, cut the whole width and fold it in four sections.)
3.
Käytin ensin nitojaa neuleen kiinnittämiseen kartonkiin. Sitten niitin loppuivat ja päädyin ompelemiseen. Pistele valmiiksi parillinen määrä reikiä ja ompele pala kiinni etupistoin.
I first used a stapler to adhere my knitting to the card stock. The I run out of staples and decided to sew the knitting on. Make wholes in even numbers and use a running stitch to adhere the piece to the card stock.
4.
Sitten liimasin ensimäisen paneelin toisen päälle, jotta peittäisin neuleen ruman nurjan puolen. Ruskeassa kortissa liimasin kortin sisäpuolelle kokonaisen toisen arkin.
I then used a tape runner to adhere the first panel to the second to cover up the ugly wrong side of the knitting. With the brown card I glued a whole another sheet of card stock to the inside of the card.
5.
Tein vielä sisäpuolelle pienen kuoren lahjaa varten. Alla olevasta kuvasarjasta näkyy, kuinka taittelin kuoren. Liimasin kuoren kortin etukanteen.
I made a small envelope for the gift. You can see below how I folded the paper. I then glued the envelope tho the inside of the card.
Jäljelle jääneestä pahvista tein pienen kortin ystävälleni. Idea on sama, mittasuhteet vain hieman erilaiset. Tähden ohjeen löysin täältä.
From the left over card stock I made a smaller card fro my friend. Same idea, different measurements. The pattern for the star is here.
Mother's Day is just around the corner. I found my present from Etsy, a seller called JewelryEveryday.JewelryEveryday. Matching necklaces for mother and daughter with birthstones.
The gift itself is so small in size, i wanted to make an effort with the card. This idea could be used for many purposes, I'm thinking Christmas cards.
Kudottu kortti - Knitted card
Tarvikkeet - Supplies:
Kartonkia - Card stock (käytin/I used Basic Gray: Nook & Pantry stack)
neule - a knitted piece
nitoja ja niittejä - a stapler and staples
liimanauhaa - tape runner
juuttinarua ja neula - jute string and a needle
1.
First, cast on 19 stitches and knit six rounds. Begin the heart in intarsia, I followed this pattern.
2.
Seuraavaksi leikkasin 30 x 30 cm kartonkiarkista 20 cm korkean, koko arkin levyisen palan. Taitoin palan puoliksi. Mittasin neuleeni ja piirsin kartonkiin joka sivulta 0,5 cm pienemmän neliön, jonka leikkasin sitten auki.
(Tein kortin aluksi Tiimarin vaaleanpunaisesta kartongista, mutta en pitänytkään lopputuloksesta. Vaihdoin craftiin. Jos teet kortin suomalaisesta standardikokoisesta arkista, leikkaa koko arkin levyinen pala ja taita se neljään osaan.)
I cut 20 cm high, sheet width piece from a 30 x 30 cm piece of card stock. I folded it in half.
I measured my knitting, and then drew a square 0,5 cm smaller from each side to the card stock. Then I cut the square out.
(I first made the card out of pink card stock, but didn't end up liking the en result. So I changed to craft. If you make the card using Finnish standard size sheet of card stock, cut the whole width and fold it in four sections.)
3.
Käytin ensin nitojaa neuleen kiinnittämiseen kartonkiin. Sitten niitin loppuivat ja päädyin ompelemiseen. Pistele valmiiksi parillinen määrä reikiä ja ompele pala kiinni etupistoin.
I first used a stapler to adhere my knitting to the card stock. The I run out of staples and decided to sew the knitting on. Make wholes in even numbers and use a running stitch to adhere the piece to the card stock.
4.
Sitten liimasin ensimäisen paneelin toisen päälle, jotta peittäisin neuleen ruman nurjan puolen. Ruskeassa kortissa liimasin kortin sisäpuolelle kokonaisen toisen arkin.
I then used a tape runner to adhere the first panel to the second to cover up the ugly wrong side of the knitting. With the brown card I glued a whole another sheet of card stock to the inside of the card.
Tein vielä sisäpuolelle pienen kuoren lahjaa varten. Alla olevasta kuvasarjasta näkyy, kuinka taittelin kuoren. Liimasin kuoren kortin etukanteen.
I made a small envelope for the gift. You can see below how I folded the paper. I then glued the envelope tho the inside of the card.
From the left over card stock I made a smaller card fro my friend. Same idea, different measurements. The pattern for the star is here.
11.11.2013
Pääkoristeita - Headdresses
Vikkelät sormet ja iso mielikuvitus ovat tanssinopettajan parhaat apuvälineet, ainakin mitä pääkoristeiden tekoon tulee. Balettioppilaani esittivät sisäköitä ja askartelin heille päähineet. Lavalle tehtävissä koristeissa on se hyvä puoli, että vaikka ne läheltä näyttäisivätkin hieman epäsiisteiltä, lavalla ne silti näyttävät hyviltä.
Quick fingers and a big imagination are a dance teachers greatest assets - when it comes to making headdresses. My ballet students danced as house maids and I decided to make their headdresses. When making things for the stage, you don't have to be too exact. Even though the headdress looks a bit messy close up, it will still look good on stage.
Tarvikkeet:
Hiuspantoja (Eurokaupasta 1€/kpl!)
Kartonkia (Tiimari)
Pitsinauhaa (Eurokangas)
Nitoja ja niittejä
Sakset
Kimalleliimaa (halutessasi, Tiimari)
What you need:
Hair bands (I bought mine from the 1€ store)
Card stock
Lace ribbon
A stapler and staples
Scissors
Glitter glue (optional)
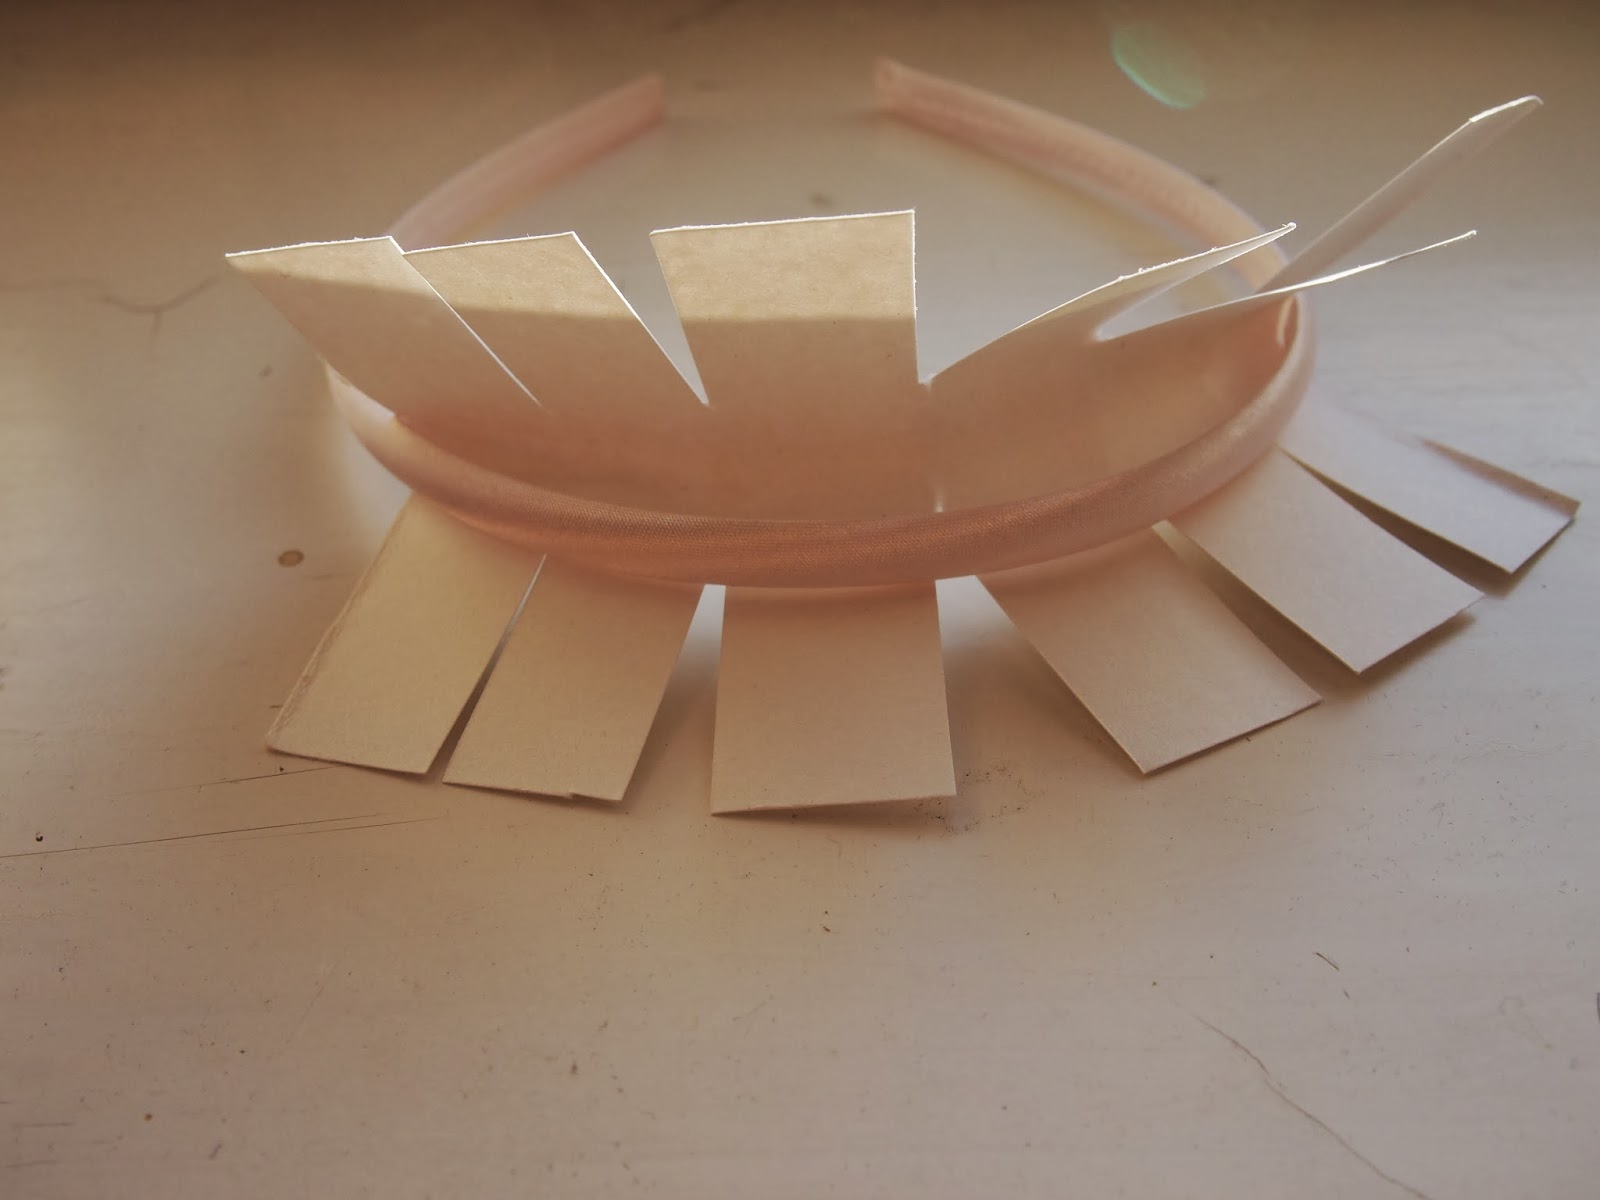
Leikkaa kartongista noin 12x8 cm pala ja taita se pituussuunnassa kaksinkerroin. Pidä taitettu puoli ehjänä, mutta leikkaa toiseen reunaan muutaman sentin välein koloja.
Cut approximately cm piece of the card stock and fold it in half lengthwise. Keep the folded side in tact, and cut slivers to the other side.
Laita hiuspanta kartongin taitteeseen ja muovaile kartonkia, jotta se asettuisi paremmin pannan alle. Niittaa kiinni. Toista kaikkien sakaroiden kohdalla.
Plase your headband in the middle of the card stock and mold it to fit the headband. Staple, staple, staple.
Rypytä pitsinauhaa haluamallasi tavalla "luurangon" päälle ja kiinnitä niiteillä. Leikkaa ylimääräinen kartonki pois. Koristele halutessasi kimalleliimalla.
Rouche the lace ribbon on the "sceleton" and staple on. Cut away any excess card stock. Decorate with glitter glue.
Quick fingers and a big imagination are a dance teachers greatest assets - when it comes to making headdresses. My ballet students danced as house maids and I decided to make their headdresses. When making things for the stage, you don't have to be too exact. Even though the headdress looks a bit messy close up, it will still look good on stage.
Tarvikkeet:
Hiuspantoja (Eurokaupasta 1€/kpl!)
Kartonkia (Tiimari)
Pitsinauhaa (Eurokangas)
Nitoja ja niittejä
Sakset
Kimalleliimaa (halutessasi, Tiimari)
What you need:
Hair bands (I bought mine from the 1€ store)
Card stock
Lace ribbon
A stapler and staples
Scissors
Glitter glue (optional)
Leikkaa kartongista noin 12x8 cm pala ja taita se pituussuunnassa kaksinkerroin. Pidä taitettu puoli ehjänä, mutta leikkaa toiseen reunaan muutaman sentin välein koloja.
Cut approximately cm piece of the card stock and fold it in half lengthwise. Keep the folded side in tact, and cut slivers to the other side.
Laita hiuspanta kartongin taitteeseen ja muovaile kartonkia, jotta se asettuisi paremmin pannan alle. Niittaa kiinni. Toista kaikkien sakaroiden kohdalla.
Plase your headband in the middle of the card stock and mold it to fit the headband. Staple, staple, staple.
Rypytä pitsinauhaa haluamallasi tavalla "luurangon" päälle ja kiinnitä niiteillä. Leikkaa ylimääräinen kartonki pois. Koristele halutessasi kimalleliimalla.
Rouche the lace ribbon on the "sceleton" and staple on. Cut away any excess card stock. Decorate with glitter glue.
Tunnisteet:
askartelu,
baletti,
ballet,
crafting,
headdress,
house maid,
pääkoriste,
sisäkkö
Tilaa:
Blogitekstit (Atom)